Being able to edit an existing WordPress template and actually knowing what you are doing is great. Building your own can be fun too, but most of the time you will find yourself in a slum of functions you’ve never heard of. The most common function of a template is to support given functions from the framework itself. One of these functions is the WordPress menu.
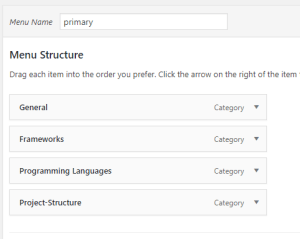
Let’s start by creating our menu in our admin panel. Therefor go to Appearance -> Menus. On this page you can create your own. Here is mine to demonstrate a simple structure:

Now that we have our base we have to dig into our code base and create our simple implementation. For this step we will go to our functions.php in our template folder and add the following code-snippet. (The comments in the snippet pretty much explains everything)
function my_theme_setup(){
    //Add menus to our theme support
    add_theme_support('menus');
    // At this time we only want to implement one menu
    register_nav_menu( 'primary', __( 'Primary Menu', 'theme-slug' ) );
}

//On initialization add execute our function
//If your template already has this line of code
//just add your function to function listed in it
add_action('init', 'my_theme_setup');
After we registered our place in our theme we have actually show it. For this we have to get to our place where our specific menu should be (probably header.php) and add following code there:
wp_nav_menu(array(
    'theme_location' => 'primary',
    'menu_class'     => 'primary-menu'
    ));
It’s needless to say, that the theme_location should match with the first parameter given in our register_nav_menu in the code above. So what now? After refreshing our site we still can’t see anything. The solution is pretty simple. Go back to the backend where you created you menu (Appearance -> Menus). Now there should be a check box for Display Location: Primary Menu. After checking this one and refreshing your site, you should already see your menu on your page. WordPress generates a huge pile of html-code for your menu and for some of you, this might be the end of the task. But if you’re using a CSS framework or want a different menu-structure, you might want to use a walker.
A what?
Exactly, a walker. The walker class was implemented in WordPress 2.1 to provide the ability to edit all the tree-like data structures and rendering it into an HTML-Codeblock. And even though the walker class has much more to offer, than what I am about to show your right now, I wanted to cover just the basic idea of working with our custom walker.
functions.php
/**
 * Create a simple nav menu
 */
class Nav_Menu_Simple extends Walker_Nav_Menu
{
    /**
     * "Start Level".
     * This method is run when the walker reaches the start of a new "branch" in the tree structure.
     * Generally, this method is used to add the opening tag of a container HTML element.
     * (such as <ol>, <ul>, or <div>) to $output
     *
     * https://developer.wordpress.org/reference/classes/Walker/start_lvl/
     *
     * @param string $output Passed by reference. Used to append additional content.
     * @return void
     */
    public function start_lvl( &$output )
    {
        $output .= '<ul class="my-personal-nav-class">';
    }


    /**
     * "Start Element".
     * Generally, this method is used to add the opening HTML tag for a single tree item.
     * (such as <li>, <span>, or <a>) to $output
     *
     * https://developer.wordpress.org/reference/classes/Walker/start_el/
     *
     * @param string  $output               used to append additional content (passed by reference)
     * @param object  $item                 menu item data object
     * @param int     $depth                depth of menu item
     * @param array   $args                 an array of additional arguments
     * @param int     $current_object_id    id of the current item
     * @return void
     */
    public function start_el( &$output, $item, $depth, $args, $current_object_id = 0 )
    {
        // initialize
        $output     .= '<li class="menu-item">';

        // evaluate the given attributes and add them, if not empty, to our link
        $attributes  = ! empty( $item->attr_title ) ? ' title="'  . esc_attr( $item->attr_title ) .'"' : '';
        $attributes .= ! empty( $item->target )     ? ' target="' . esc_attr( $item->target     ) .'"' : '';
        $attributes .= ! empty( $item->xfn )        ? ' rel="'    . esc_attr( $item->xfn        ) .'"' : '';
        $attributes .= ! empty( $item->url )        ? ' href="'   . esc_attr( $item->url        ) .'"' : '';

        // add classes to the link, add another class based on depth
        $attributes .= ' class="menu-item-link ' . ( $depth > 0 ? 'sub-menu-item-link' : 'main-menu-item-link' ) . '"';

        // build the html output and filter it
        $item_output = sprintf( '%1$s<a%2$s>%3$s%4$s%5$s</a>%6$s',
            $args->before,
            $attributes,
            $args->link_before,
            apply_filters( 'the_title', $item->title, $item->ID ),
            $args->link_after,
            $args->after
        );

        // since $output is called by reference, we don't need to return anything
        $output .= apply_filters(
            'walker_nav_menu_start_el'
            ,   $item_output
            ,   $item
            ,   $depth
            ,   $args
        );
    }


    /**
     * "End Element".
     * Generally, this method is used to add any closing HTML tag for a single tree item.
     * (such as </li>, </span>, or </a>) to $output
     * Note that elements are not ended until after all of their children have been added.
     *
     * https://developer.wordpress.org/reference/classes/Walker/end_el/
     *
     * @param string $output Passed by reference. Used to append additional content.
     * @return void
     */
    function end_el( &$output )
    {
        $output .= '</li>';
    }

    /**
     * "End Level".
     * This method is run when the walker reaches the end of a "branch" in the tree structure.
     * Generally, this method is used to add the closing tag of a container HTML element.
     * (such as </ol>, </ul>, or </div>) to $output
     *
     * https://developer.wordpress.org/reference/classes/Walker/end_lvl/
     *
     * @param string $output Passed by reference. Used to append additional content.
     * @return void
     */
    public function end_lvl( &$output )
    {
        $output .= '</ul>';
    }
}
header.php
To make our walker work, we have to modify our call
wp_nav_menu(array(
    'theme_location' => 'primary',
    'menu_class'     => 'primary-menu',
    'walker' => new Nav_Menu_Simple()
    ));
Refresh you site and you should already see a huge difference. Now you are able to modify your menu or your walker to your likes and add some css for some styles.
